1.3. Configure Eclipse for Developing Sunflower
| Author: | Jim Klo <jim.klo@sri.com> |
|---|
Table of Contents
1.3.1. Recommended Prerequisites for Macintosh OS X
1.3.1.1. Homebrew
Installation X Code and Homebrew are recommended for all.
Go to App Store and download and install X Code.
Launch X Code and install the Command Line tools.
Install Homebrew: http://brew.sh/
ruby -e "$(curl -fsSL https://raw.githubusercontent.com/Homebrew/install/master/install)"
1.3.2. Get Java 8
Needed to enable JavaFX tooling in Eclipse. You should be using Java JDK 1.8.0 update 45.
1.3.2.1. Get Java 8 for Macintosh OS X
Open App Store, click on “updates” and install any OS X related items (one of the recent updates completely removes Java).
Then go and download Java 8 JDK and install: http://www.oracle.com/technetwork/java/javase/downloads/jdk8-downloads-2133151.html
1.3.2.2. Get Java 8 for Windows
Download the latest JDK8 from http://www.oracle.com/technetwork/java/javase/downloads/jdk8-downloads-2133151.html and install. OK to use 64-bit version, and OK to accept default install location.
At a command prompt, test that the install went OK by entering javac -version. You should see something like: javac 1.8.0_45
If javac can’t be found, you probably need to update or add a JAVA_HOME or PATH environment variable.
1.3.3. Get Maven
Maven can be installed by downloading the appropriate package from here: http://maven.apache.org/download.cgi and following the installation instructions. Macintosh users with Homebrew can use the brew command instead.
1.3.3.1. Get Maven for Macintosh OS X using Homebrew
You can always follow the Official Instructions for installing Maven, however, installation via brew simplifies the steps.
Open Terminal.app and enter
brew install maven
You might be prompted to perform the following:
brew link maven
1.3.3.2. Get Maven for Other Platforms
Download and follow the installation instructions here: http://maven.apache.org/download.cgi for installing maven.
1.3.4. Check Maven Installation
Once installed open Terminal.app, Command.exe, or a shell and type:
mvn --version
The output should look similar to this:
$ mvn --version
Apache Maven 3.2.5 (12a6b3acb947671f09b81f49094c53f426d8cea1; 2014-12-14T09:29:23-08:00)
Maven home: /usr/local/Cellar/maven/3.2.5/libexec
Java version: 1.8.0_45, vendor: Oracle Corporation
Java home: /Library/Java/JavaVirtualMachines/jdk1.8.0_45.jdk/Contents/Home/jre
Default locale: en_US, platform encoding: UTF-8
OS name: "mac os x", version: "10.10.3", arch: "x86_64", family: "mac"
If it does not have the right version of Java, add or modify a file in your Home directory named ‘.mavenrc’ and add the following line:
export JAVA_HOME=/Library/Java/JavaVirtualMachines/jdk1.8.0_45.jdk/Contents/Home
Rerun the previous mvn --version command and it should use the correct Java Version.
Your Home directory for different platforms can be found in the table below:
| Platform | Location | Example |
|---|---|---|
| Macintosh OS X | /Users/<username> |
/Users/jklo |
| Windows | <root>\Users\<username> |
C:\Users\jklo |
| Linux | /home/<username> |
/home/jklo |
1.3.5. Install Git client (GIT)
You can use your choice of Git client.
Some popular clients are:
| Platform | Application | Download |
|---|---|---|
| Git | macOS, Windows, Linux | https://git-scm.com/downloads |
| SourceTree | macOS, Windows | https://www.sourcetreeapp.com/ |
Macintosh users may install an up-to-date command line version with Homebrew:
brew install git
Note
As the Sunflower source code has migrated to Git, you will only need Subversion to access legacy ontologies.
Install Subversion client (SVN)
Use can use your choice of Subversion client. Please note that version of your client needs to match the version of your subversion workspace.
Some popular clients are:
| Platform | Application | Download |
|---|---|---|
| svnX | Macintosh OS X | http://code.google.com/p/svnx/ |
| TortoiseSVN | Windows | http://tortoisesvn.net/downloads.html |
You will need to make JavaHL available: http://subclipse.tigris.org/wiki/JavaHL (this also installs the command-line client - same command as listed below).
You can also install the command line client as well.
Macintosh OS X ships with an older version, you may install an up-to-date version with Homebrew:
brew install --universal --java subversion
For other platforms: Download or find your installer here: http://subversion.apache.org/packages.html
1.3.6. Get the Sunflower Source
Find a location on your disk with no spaces in the path, recommended is to create a folder named source in your home directoy and then change directory to that location:
mkdir ~/source
cd ~/source
Sunflower is split into multiple Git repositories as various modules are shared across different projects and customers.
| Git Repository | Docs |
Foundation |
Foundation Tasks |
Studio CE |
Studio Tasks |
|---|---|---|---|---|---|
| sunflower-docs https://scm.sri.com/scm/git/ROR/sunflower-docs |
 |
||||
| sunflower-foundation https://scm.sri.com/scm/git/ROR/sunflower-foundation |
|
|
|
|
|
| sunflower-foundation-tasks https://scm.sri.com/scm/git/ROR/sunflower-foundation-tasks |
|
||||
| sunflower-studio https://scm.sri.com/scm/git/ROR/sunflower-studio |
|
|
To clone the required source to your workstation using git, you can utilize the following command:
git clone https://<EID>@<Git Repository URL>
Noting that you should replace <EID> with your own SVN username. For example to clone sunflower-studio:
git clone https://e12345@scm.sri.com/scm/git/ROR/sunflower-studio
Repeat this for each repository you need to clone.
Note
As Sunflower Source code has migrated to Git, the following remain for accessing legacy ontologies. These steps are not required.
Find a location on your disk with no spaces in the path, recommended is to create a folder named svn in your home directory:
mkdir ~/svn
Then checkout the source from Subversion. Note that you should replace <EID> with your own SVN username.
cd ~/svn
svn checkout https://<EID>@scm.sri.com/scm/svn/ROR/RAVE/trunk RAVE
The checkout is quite large and will take a bit of time.
1.3.7. Build Sunflower with Maven
Since the Eclipse build depends upon Maven, we should ensure that we can build with Maven before working with Eclipse. First you need to login to SRI’s Artifactory Pro with your LDAP username and password to generate an encrypted password. To do this, follow the instructions in the Artifactory Credentials section and then return here with your encrypted password.
Next you need to configure maven to use the Sunflower Local Artifactory.
Create or edit the file ~/.m2/settings.xml. If you don’t have a .m2 folder
in your Home directory, you can safely create an empty .m2 directory within to
copy the setting file into. The XML block below represents a complete maven
settings file. Be sure to replace [artifactory login] and
[artifactory encrypted password] with your Artifactory user login and
encrypted password respectively.
1 2 3 4 5 6 7 8 9 10 11 12 13 14 15 16 17 18 19 20 21 22 23 24 25 26 27 28 29 30 31 32 33 | <?xml version="1.0" encoding="UTF-8"?>
<settings xmlns="http://maven.apache.org/SETTINGS/1.0.0"
xmlns:xsi="http://www.w3.org/2001/XMLSchema-instance"
xsi:schemaLocation="http://maven.apache.org/SETTINGS/1.0.0 http://maven.apache.org/xsd/settings-1.0.0.xsd">
<servers>
<server>
<id>sunflower</id>
<username>[artifactory login]</username>
<password>[artifactory encrypted password]</password>
</server>
</servers>
<profiles>
<profile>
<id>artifactory</id>
<repositories>
<repository>
<id>sunflower</id>
<name>sunflower-local</name>
<url>https://artifactory.sri.com/artifactory/sunflower-local</url>
<releases>
<enabled>true</enabled>
</releases>
<snapshots>
<enabled>true</enabled>
</snapshots>
</repository>
</repositories>
</profile>
</profiles>
<activeProfiles>
<activeProfile>artifactory</activeProfile>
</activeProfiles>
</settings>
|
If you have an existing ~/.m2/settings.xml you can copy the <server>
from lines 6 - 10 and the <profile> from lines 13 - 37 into your existing file.
Ensure that the <id> from lines 7 and 16 match. Also be sure activate the profile
by adding it to <activeProfiles> as shown on line 40.
Save and close the ~/.m2/settings.xml file once the configuration is complete.
We can now build Sunflower Studio CE.
cd ../sunflower-bootstrap
mvn verify -DskipTests -DbuildType=core
Once complete the binary build locations are located:
| Distribution | Artifact Path |
|---|---|
| Sunflower Studio Tasks | src-root/sunflower-sri/com.sri.sunflower.distrib.tasks/target/products |
| Sunflower Studio CE | src-root/sunflower-open/com.sri.sunflower.distrib.core/target/products |
- The ZIP files in each
productsfolder contains the platform specific distribution as indicated in it’s filename. - Each
productsfolder contains a subfolder that contains an tree of unzipped folders containing the built binaries.
1.3.8. Get Eclipse SDK and Configure Target Platform
1.3.8.1. Install Eclipse SDK
Download Eclipse SDK from here: http://www.eclipse.org/downloads/packages/eclipse-rcp-and-rap-developers/neon2
Launch Eclipse SDK, create a new workspace when prompted to select one. This should be a different location than where you checked out the Sunflower source.
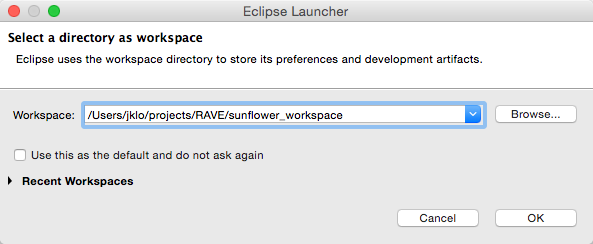
Select where your workspace will be location.
Open the Install New Sofware... dialogue:
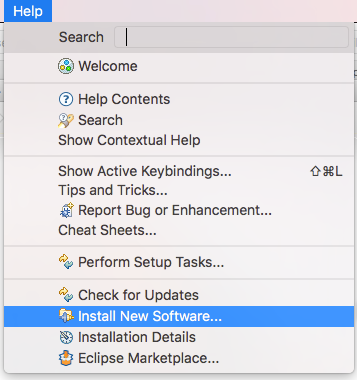
Select Help > Install New Software..
When the dialogue is open, do NOT type anything into the Work with: field, just the click Add...
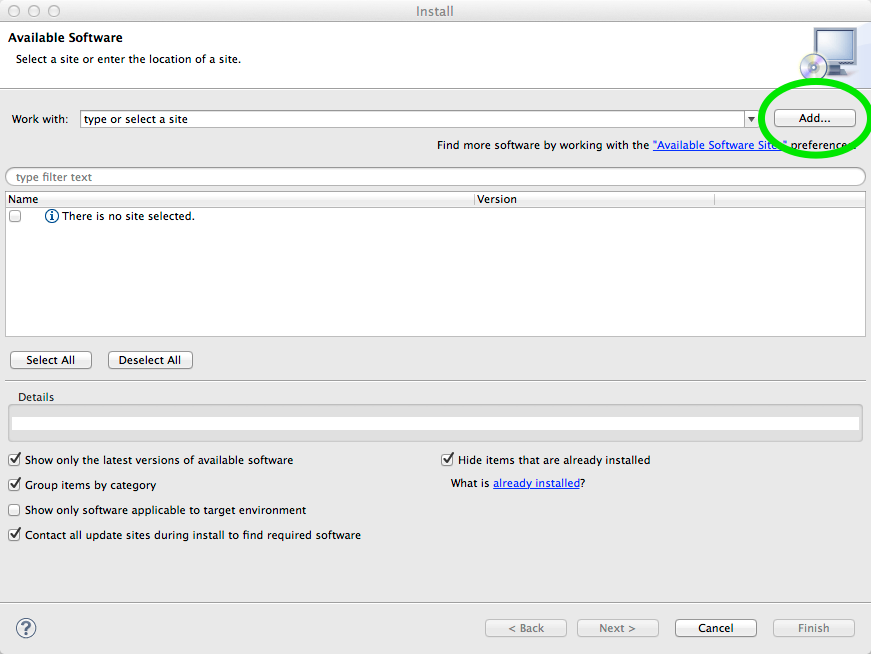
Install software dialogue.
Add the following update site:
Name Update Site URL XText http://download.eclipse.org/modeling/tmf/xtext/updates/composite/releases/ 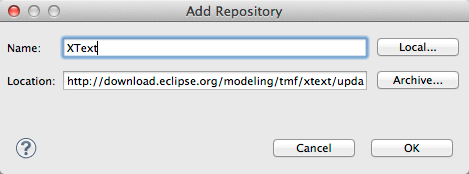
Enter the Name and Location of XText and it’s update site URL.
Note
There’s no software that will be installed during this step. The next step requires XText as a dependency and will download only the necessary parts it needs.
Repeat adding a second update site:
Name Update Site URL e(fx)clipse http://download.eclipse.org/efxclipse/updates-released/2.4.0/site 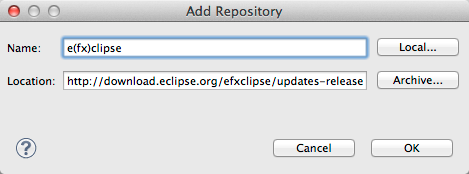
Enter the Name and Location of e(fx)clipse and it’s update site URL.
Under e(fx)clipse - install, select e(fx)clipse - IDE, then click Next >, Next >. Then select “I accept the terms of the license agreements” and click Finish.
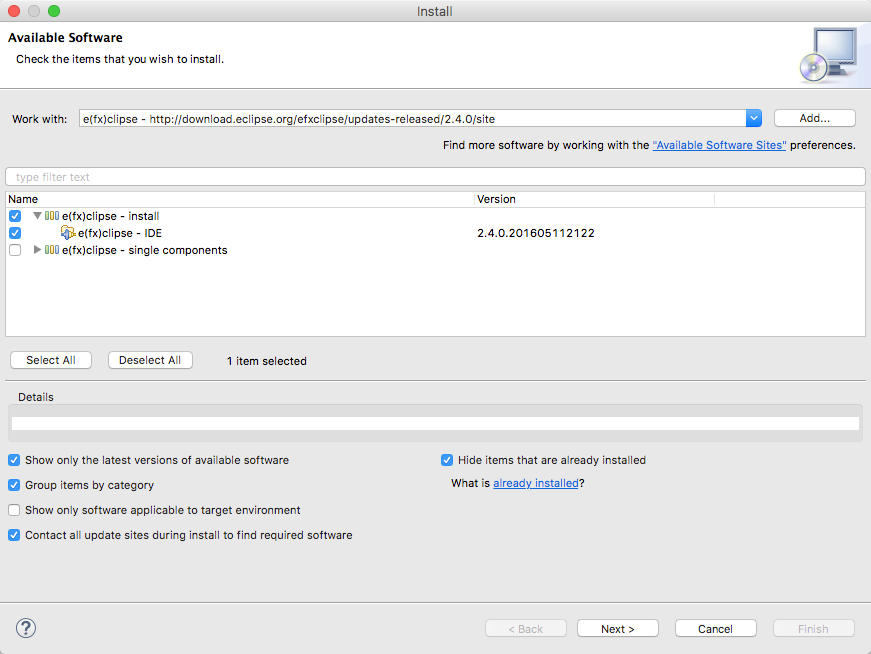
Select e(fx)clipse - IDE and click Next >.
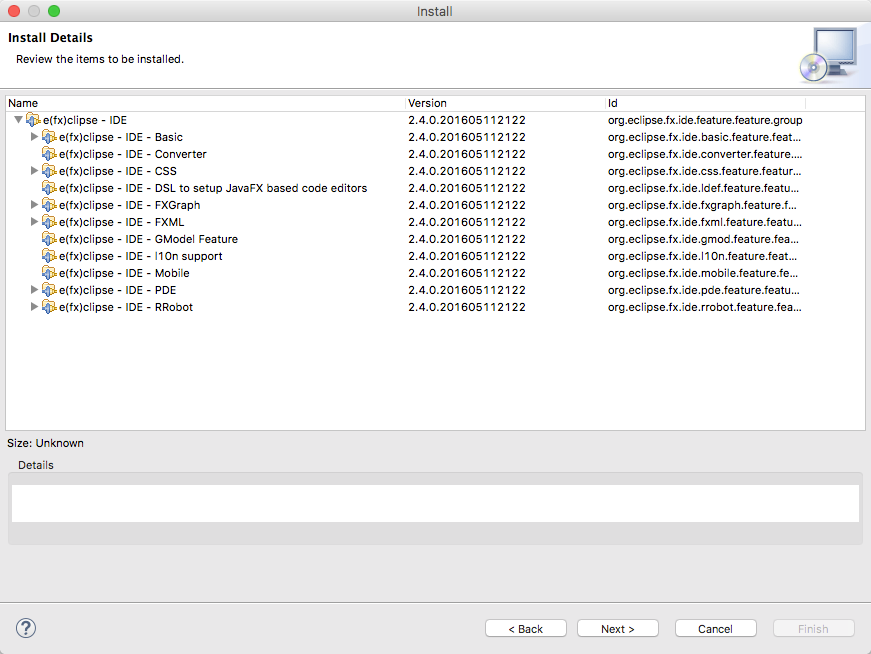
Click Next >.

Select I accept the terms of the license agreements and click Finish.
Restart Eclipse when prompted.
Select File > Import...
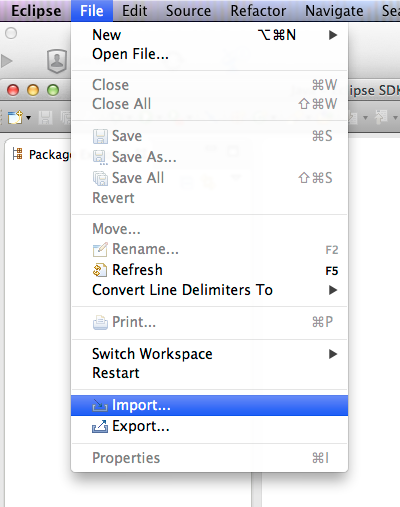
Select Import.. from the File menu.
In the Import Wizard dialogue, select General > Existing Projects into Workspace, then click Next >.
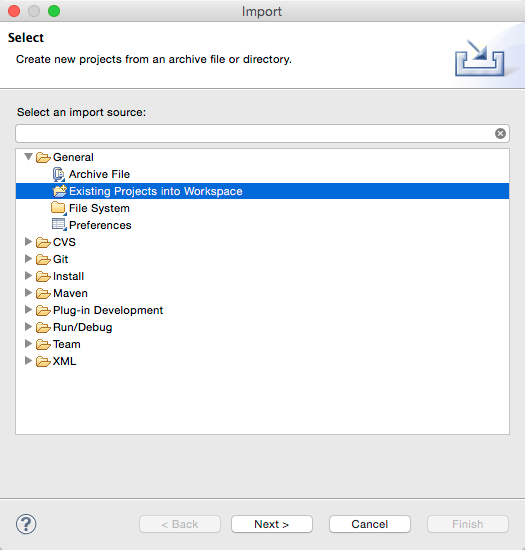
Select Existing Projects into Workspace, then click Next >.
11. On the next page of the Import Wizard, click Browse... to Select root directory, and select the sunflower-studio folder you previously checked out from Git. Then check the option Search for nested projects. You should see a list of pre-existing projects. Uncheck the com.sri.bundledependency and com.sri.sunflower.dependencyeditor projects. Click Finish to import the projects.
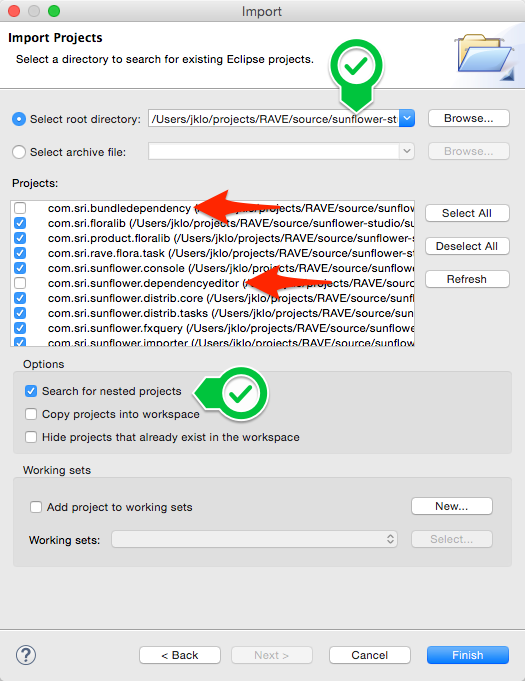
Set the root directory of where you checked out sunflower-studio from Git and then check Search for nested projects.
Note
After the import is complete, it is normal for several of the projects to be in an error state. This will be corrected by subsequent steps. You may disregard these errors for now.
Now we need to set the Target Platform. Open Eclipse Preferences (the location of this menu item varies across platforms), and enter “Target” into the search box. Select Target Platform, then select Sunflower Neon, then click Apply.
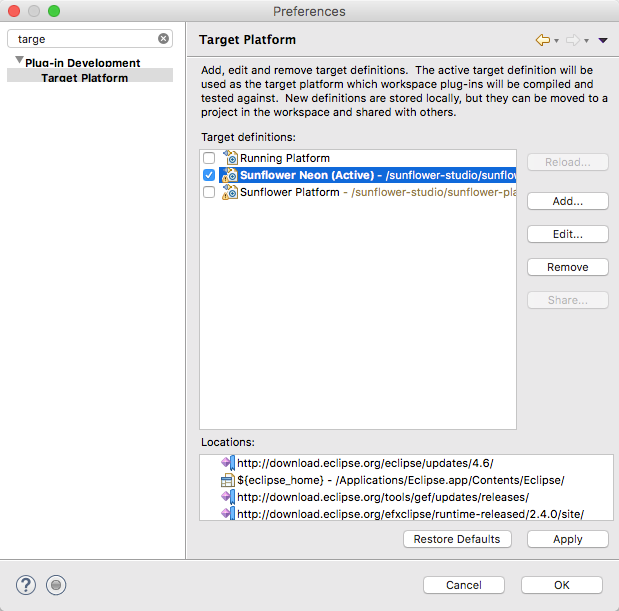
Select Target Platform, then select Sunflower Neon, then click Apply.
Check Sunflower Neon and it should indicate it is “(Active)”. Click OK.
Select Project > Clean.... Then select Clean all projects and click OK.
This should resolve all project errors, and you are ready to start using Eclipse to develop.
1.3.9. Tips
- If you want to increase Eclipse memory edit eclipse.ini and set -Xmx4096m (on a Mac: right-click on the app - show package contents - Contents - MacOS to find that file)