Import/Translate from OWL, CSV, and SQL
There are five import options in the Sunflower menu, as shown in Fig. 94.
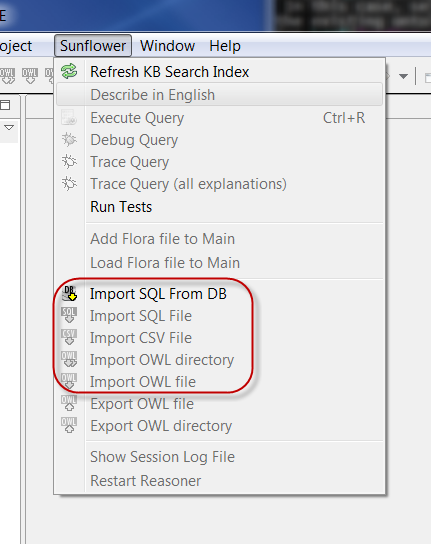
Fig. 94 Import menu
While the Import SQL From DB is always available, other options are grayed out normally and become available when a CSV/SQL/OWL file is selected.
Import OWL Directory
An OWL directory containing multiple OWL files can be imported all at once. Follow these steps to import multiple OWL files from the same OWL directory:
First, if the OWL directory is not already visible in the Sunflower navigation tree, make it visible. To do this, select File > New > Project to create a new project. When the new project dialog box pops up, expand General and select Project. Then click Next, as shown in Fig. 95.
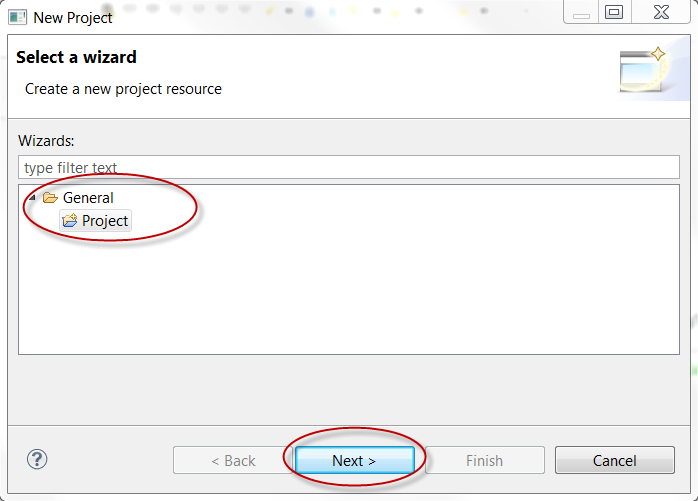
Fig. 95 New project dialog box
When the second new project dialog box pops up, enter a name for the new project, e.g. myImportedOwlProject. Uncheck Use default location and navigate to where the .owl files are, e.g. the owl folder under UserManualExample, and make this the location of the new project, as shown in Fig. 96. Click Finish.
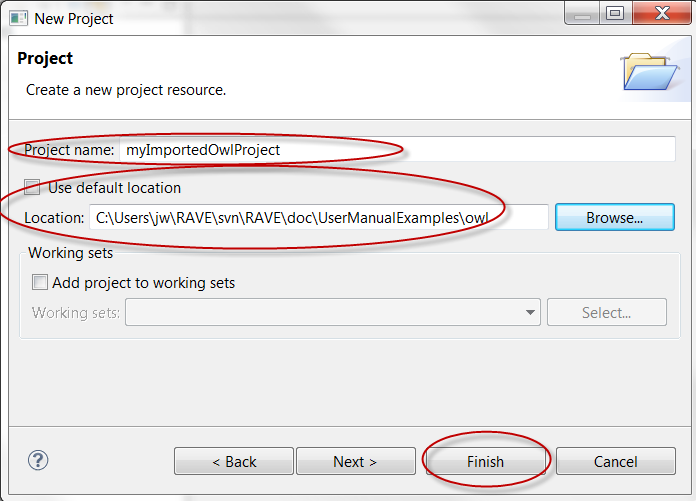
Fig. 96 Specify name and location for new project
The new project myImportedOwlProject should now appear in the navigation window. Expand this project and the .owl files to be imported should appear in the project, as shown in Fig. 97.
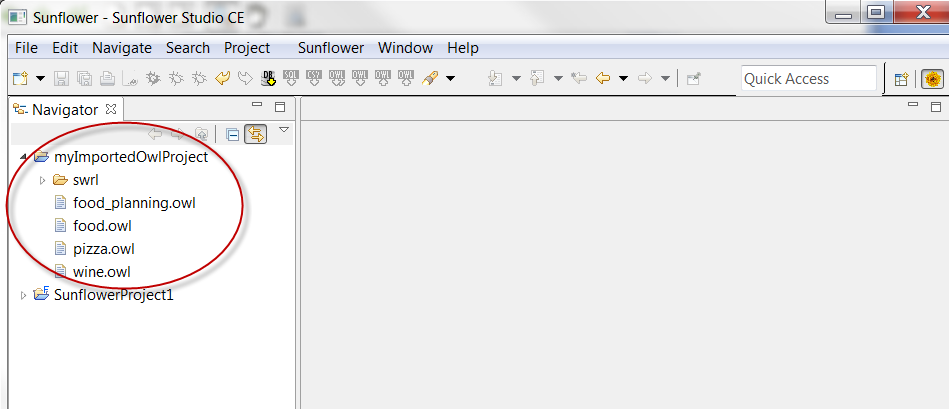
Fig. 97 Project myImportedOwlProject is created for OWL files
Choose a Sunflower project to create a new folder for the translated .flr files. If a brand new Sunflower project is to be used, first create it using the main navigation menu option File > New > Sunflower Project. In the project creation dialog window, type in a project name such as myOwlTranslationProject, and use the default location for the project, as shown in Fig. 98.
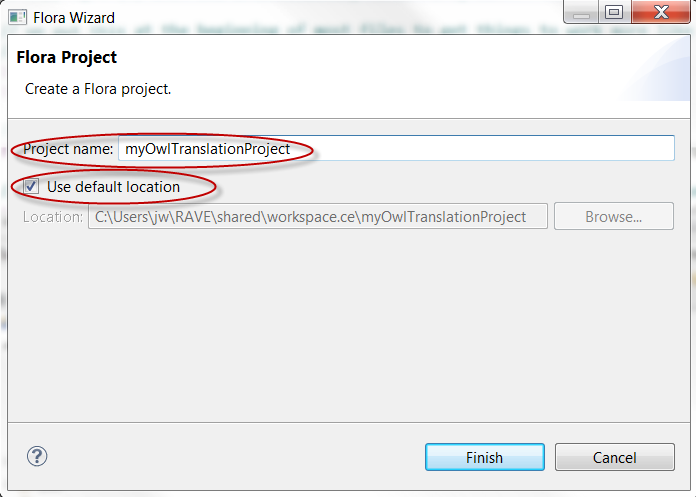
Fig. 98 New Sunflower project myOwlTranslationProject uses default location
Click to highlight myOwlTranslationProject. Then right click to select New > Folder to create a new folder in myOwlTranslationProject. Fig. 99 shows new folder owlToFlora created under myOwlTranslationProject to receive translated .flr files from the .owl files.

Fig. 99 Translation folder owlToFlora created for OWL translation
Click to highlight the translation folder you have just created, that is, owlToFlora, the Import OWL directory button in the main navigation toolbar should become enabled. Click the Import OWL directory button. A dialog box should pop up asking for the OWL project to be translated, as shown in Fig. 100. Choose myImportedOwlProject and click OK.
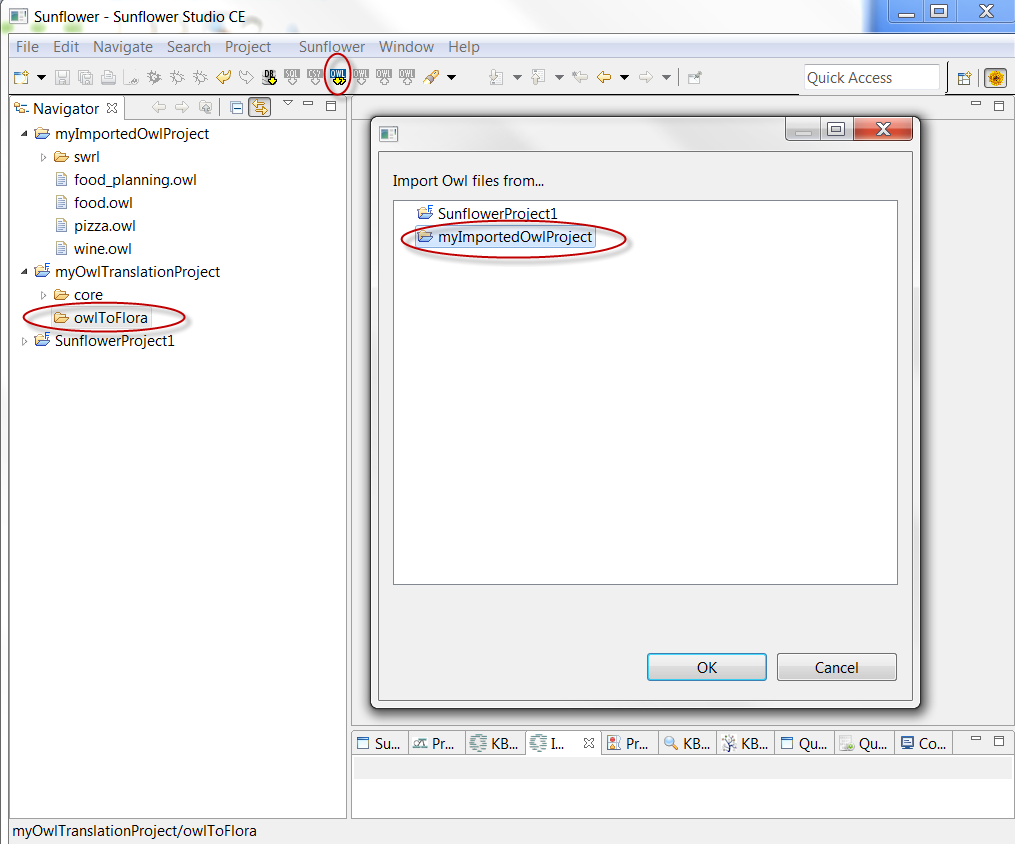
Fig. 100 Dialog box for selecting OWL project for Flora translation
All Owl files in myImportedOwlProject are translated into their Flora equivalents. Importing and translating preserves the original directory structure. The list of corresponding Flora files parallels the original list of OWL files, as seen in Fig. 101.
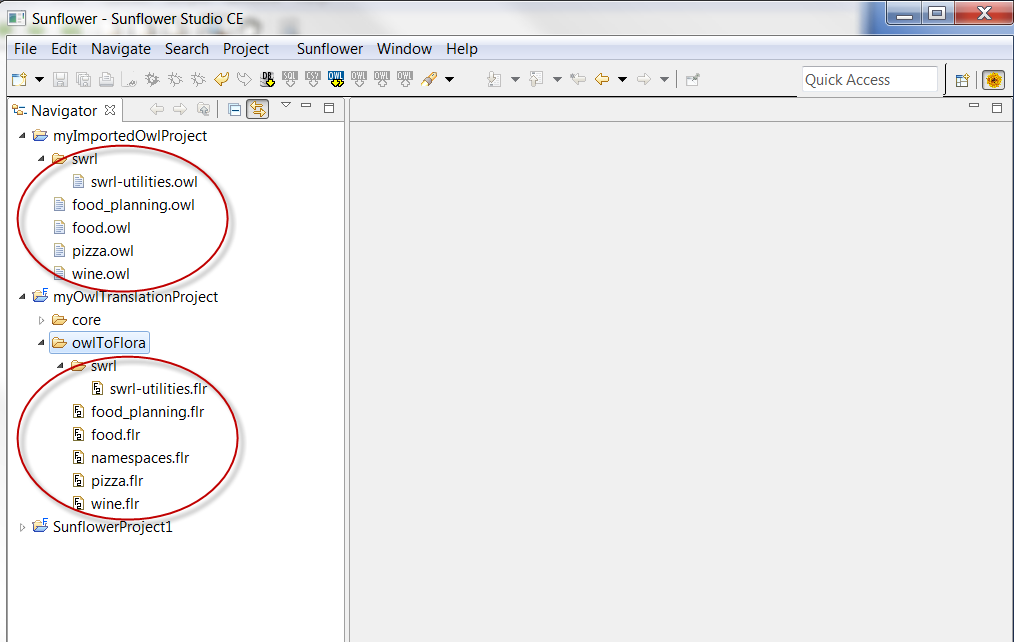
Fig. 101 A corresponding Flora file for each OWL file translated
Note that an extra file called namespaces.flr is generated, as shown in Fig. 102. This file contains information about prefixes used in the original OWL files.
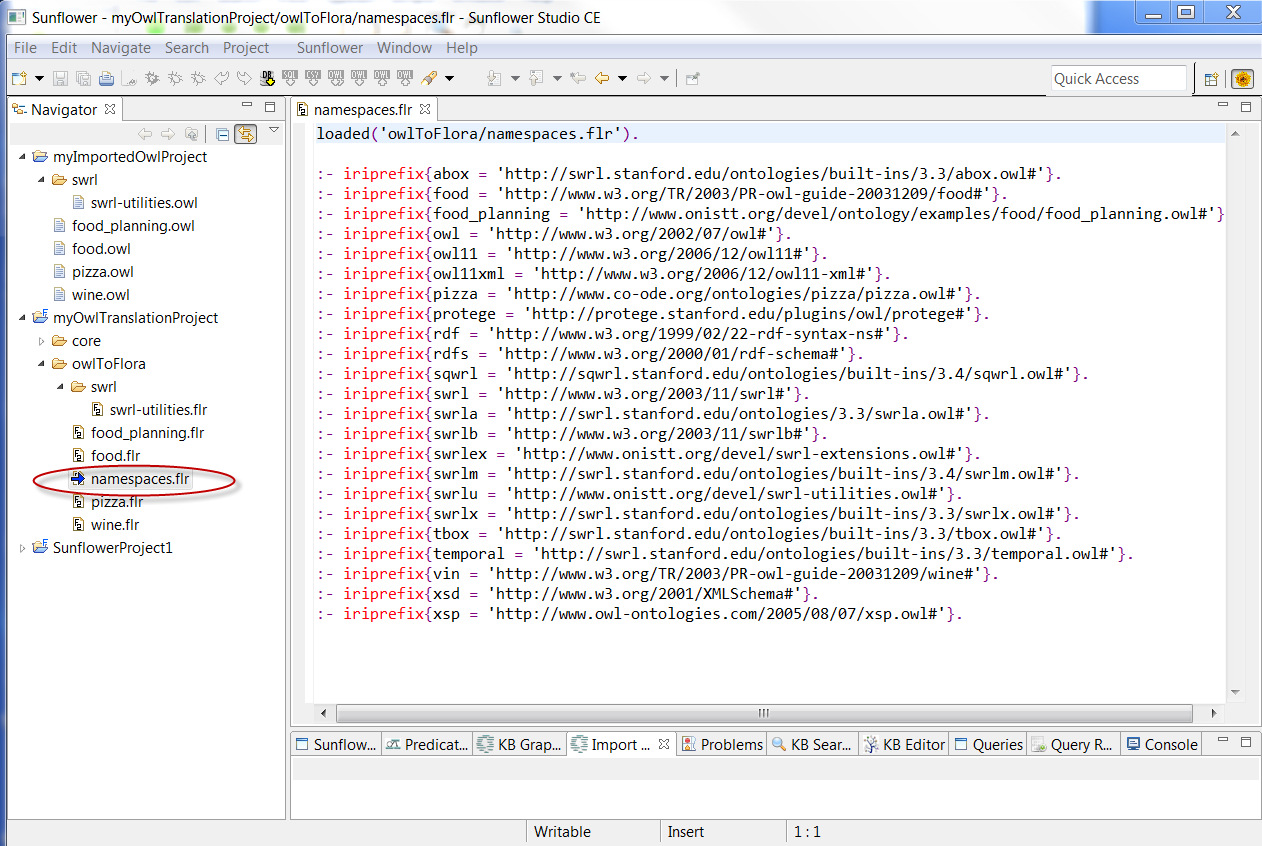
Fig. 102 Content of namespace.flr after importing an OWL directory
OWL import can also work on an individual OWL directory within a project, e.g. we can choose to translate the swrl subfolder within myImportedOwlProject. In this case, only the .owl files in the swrl folder will be translated into .flr files and placed into the translation folder owlToFlora.
The translated Flora files are ready to be used. Double click the newly translated Flora file food_planning.flr to have it loaded into Sunflower. Click to activate plugin Queries and execute a query from the list, e.g. food_planning#InRegion(?x). You should get back a list of results in the Query Results window, as seen in Fig. 103.
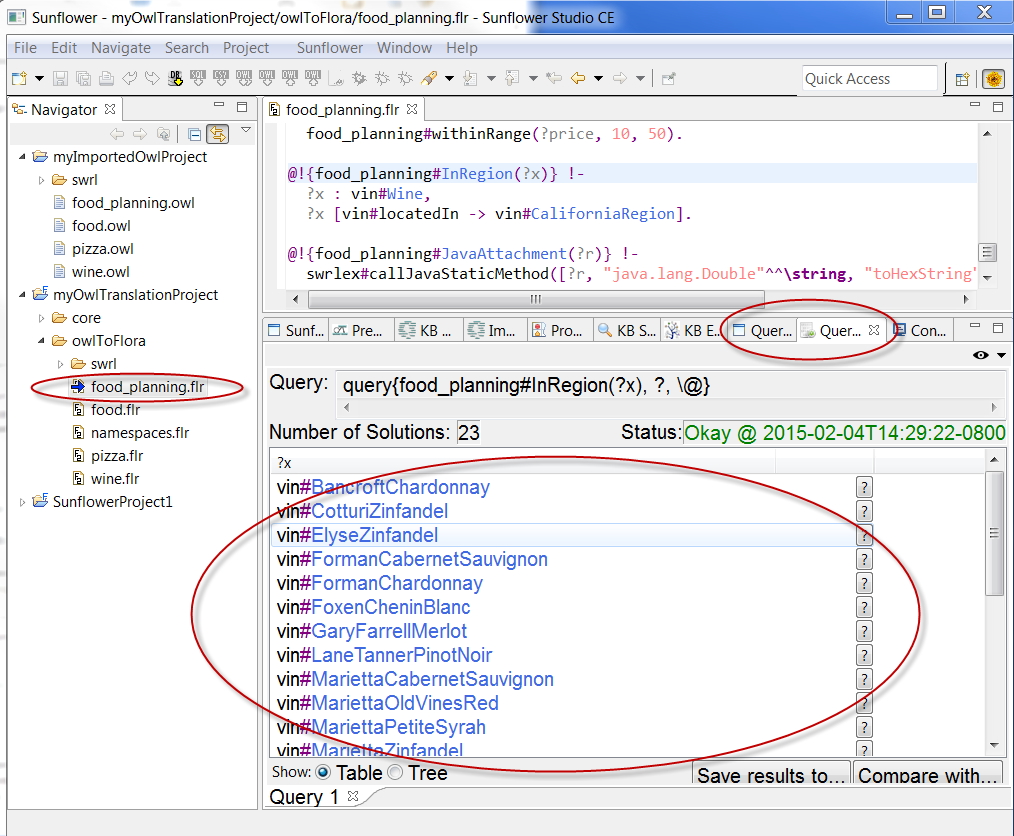
Fig. 103 Query results from executing query food_planning#InRegion(?x)
Import OWL File
The procedure for importing a single OWL file is similar to that of importing a single CSV file. Please refer to the Section on Import CSV File for details.
Import CSV File
A CSV file to be imported into Sunflower should look like what is shown in Fig. 104. That is, it should have the class name in field A1, and the property names of the class in the rest of row 1. Rows after row 1 should contain individuals of the class and their property values. For example, field A2 should contain the name of an individual, and the remaining fields in row 2 should contain the property values for that individual. The CSV file should not contain any prefix or namespace information. Universal prefixes and namespaces used are to be specified and automatically added, as explained in step 5 below.
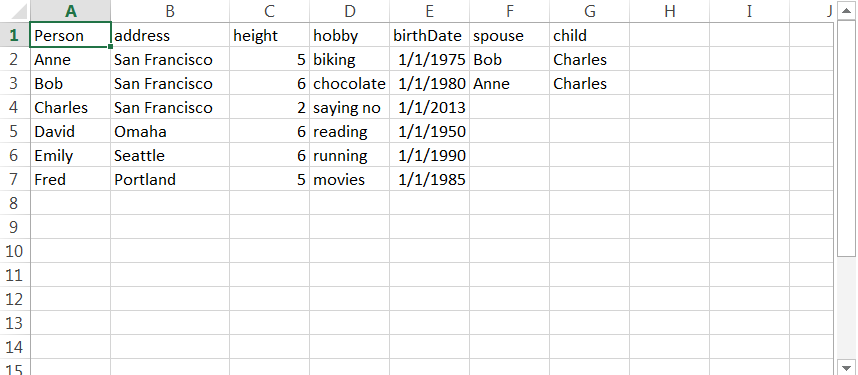
Fig. 104 Format of CSV (.xls) file for importing
Should a record have fields with multiple values, the additional values can be specified on separate lines immediately following the record. An example of this is shown in Fig. 105. One such field is hobby for Anne, which has 3 values: biking, running and skiing.
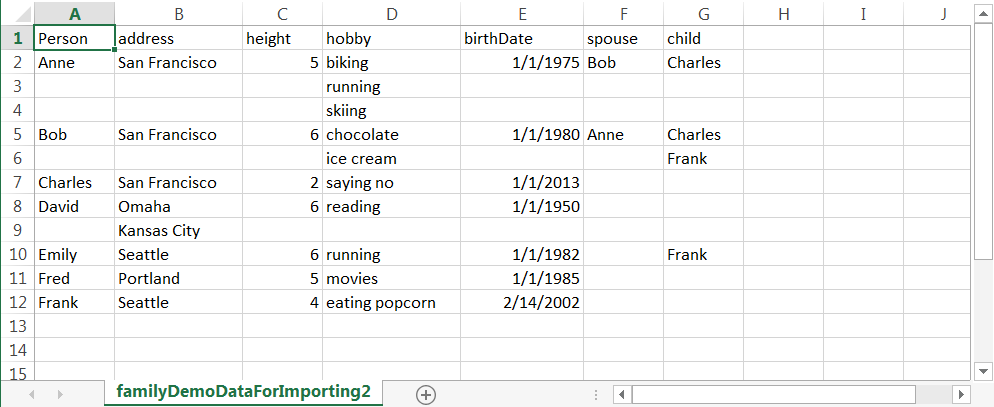
Fig. 105 CSV (.xls) file with multiple values for fields hobby, address and child
Follow these steps to import and translate a .csv file into Sunflower:
First, if the .csv file to be imported isn’t in the Sunflower navigation tree, make it visible by selecting File > New > Project. When the new project dialog box pops up, expand General and select Project. Then click Next as shown in Fig. 106.
Fig. 106 Create new project dialog
When the second new project dialog box pops up, give the new project a name, for example, myImportedCSVProject, as shown in Fig. 107. Uncheck Use default location and navigate to the parent folder where the .csv file is located, and make the parent folder the file location for the new project. Two sample .csv files are provided in the Sunflower distribution folder under UserManualExamples >> csv. We will select this folder as the new project’s file location and use the sample .csv files contained within. Click Finish.
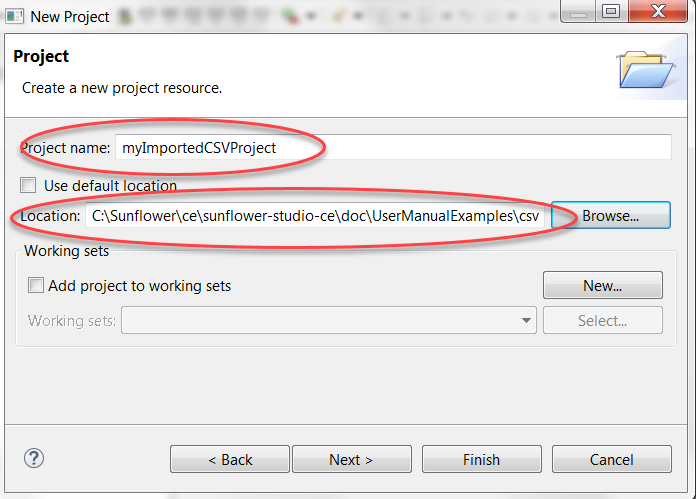
Fig. 107 Specify name and file location for new project
New project myImportedCSVProject should appear in the navigation window. Expand this new project to see the 2 sample .csv files, familyDemoDataForImporting.csv and familyDemoDataForImporting2.csv. Fig. 108 shows these files under project myImportedCSVProject.
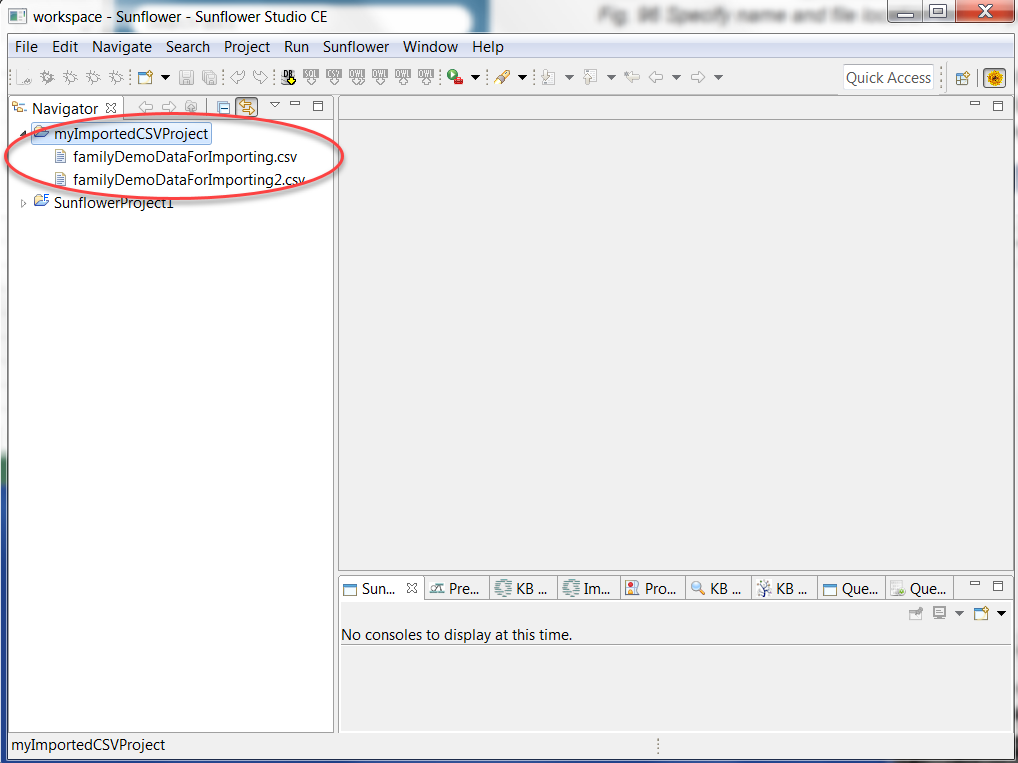
Fig. 108 New project myImportedCSVProject in navigation window
Create a Sunflower project using File > New > Sunflower Project, and give it a name such as myCSVTranslatedProject, as shown in Fig. 109. Leave the Use default location check box checked. We will use the default location for this new Sunflower project.
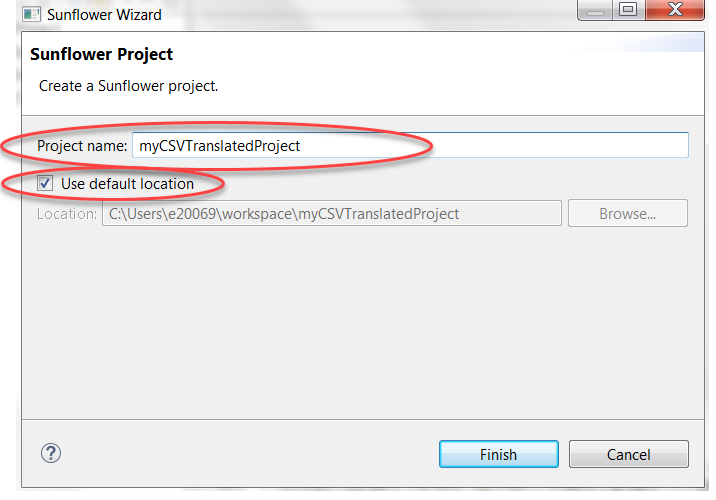
Fig. 109 Create new Sunflower project myCSVTranslatedProject for csv translation
Click to highlight myCSVTranslatedProject in the navigation window. Then right click and choose New > Folder to create a new folder for the csv translation. Give this new folder a name such as csvToFlora, as shown in Fig. 110. Click Finish.
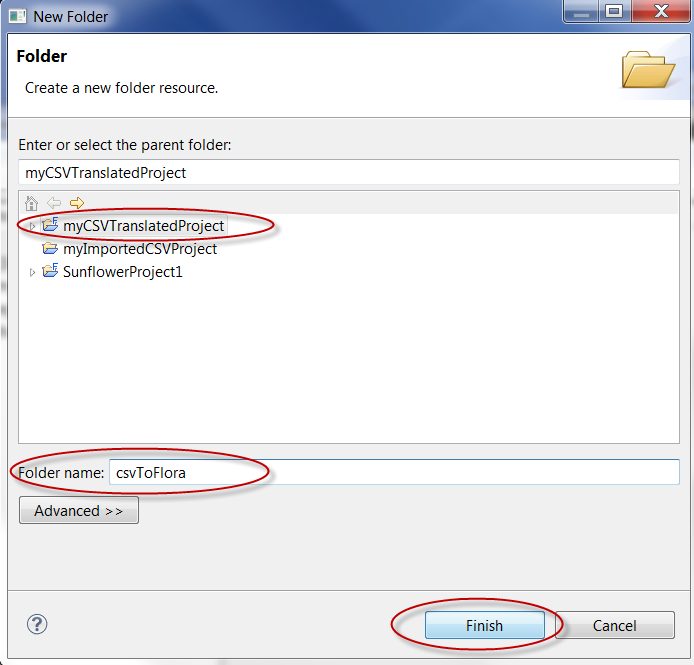
Fig. 110 Create folder csvToFlora in myCSVTranslatedProject for csv translation
In the navigation window, expand project myImportedCSVProject. Click to highlight familyDemoDataForImporting.csv (file content previously shown in Fig. 104). Once the .csv file is highlighted, the Import CSV File button in the main navigation toobar should become enabled, as shown in Fig. 111. Click the Import CSV File button.
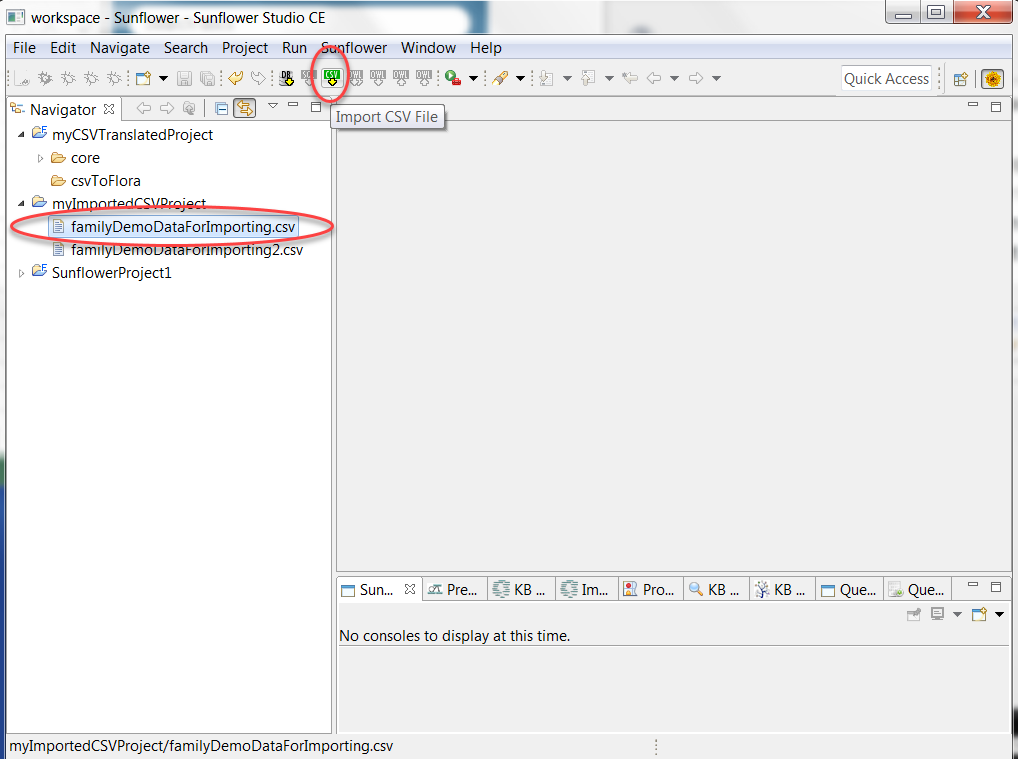
Fig. 111 Import CSV File button becomes enabled when .csv file is selected
A dialog window pops up asking for the prefixes and namespaces to be used for the translation. Enter them accordingly and click OK to start the translation, as shown in Fig. 112.

Fig. 112 Prefix and namespace dialog box for csv translation
Next, a file navigation tool pops up asking for the location of the translated file. To place the translated file in the csvToFlora folder, navigate to where your current Sunflower workspace is, go into project folder myCSVTranslatedProject then subfolder csvToFlora, and click Save. The translated file is automatically offered a default name which is the same as the .csv file, in this case, familyDemoDataForImporting.flr, as seen in Fig. 113.
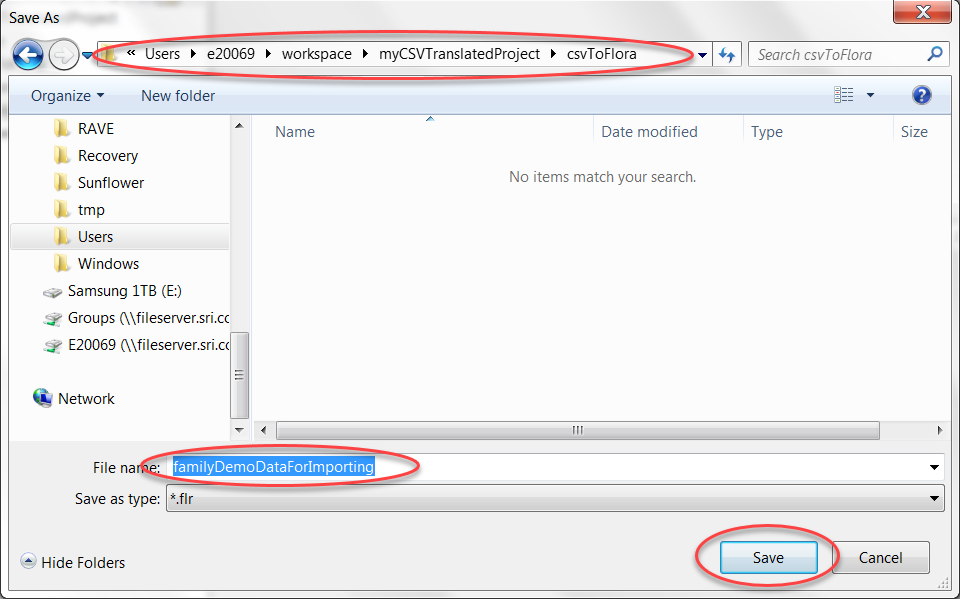
Fig. 113 Navigate to where the translated file is to be placed
After the translation is done, a .flr file should appear in the selected location. Double click this new .flr file to load its content into the Text Editor. Fig. 114 shows the first 2 translated records of familyDemoDataForImporting.flr in the Text Editor.
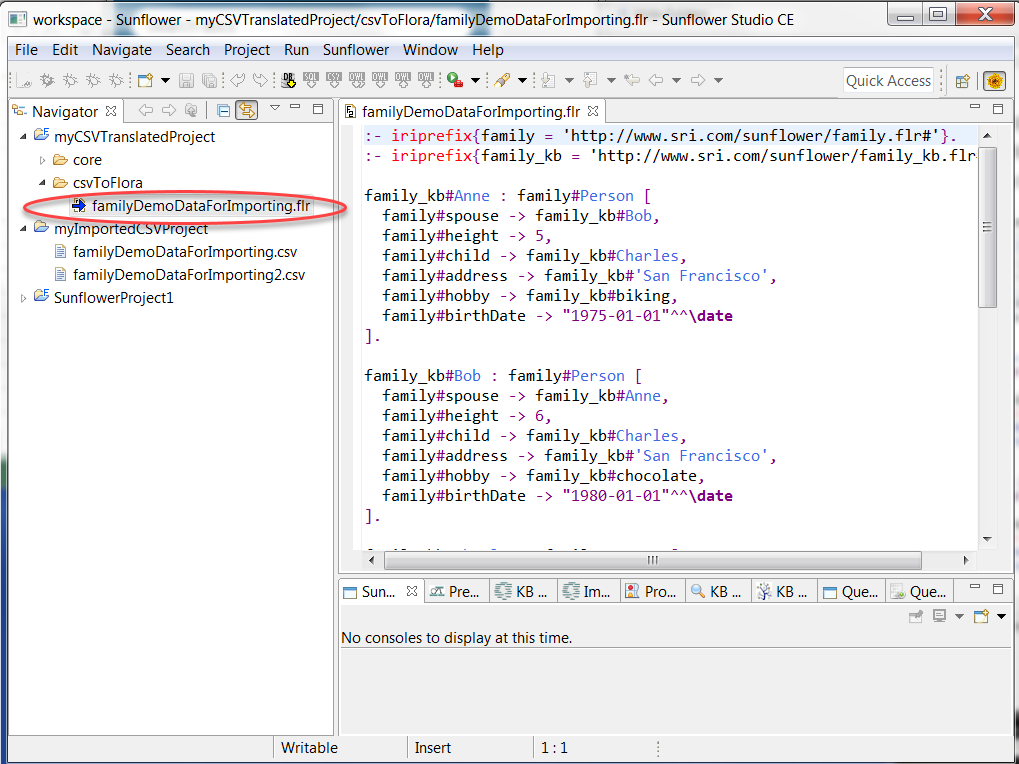
Fig. 114 Content of .flr file from translating familyDemoDataForImporting.csv
If, instead of using familyDemoDataForImporting.flr, we use familyDemoDataForImporting2.csv (content previously shown in Fig. 105) for import. The resulting .flr file will have records with multi-valued fields, as seen in Fig. 115.
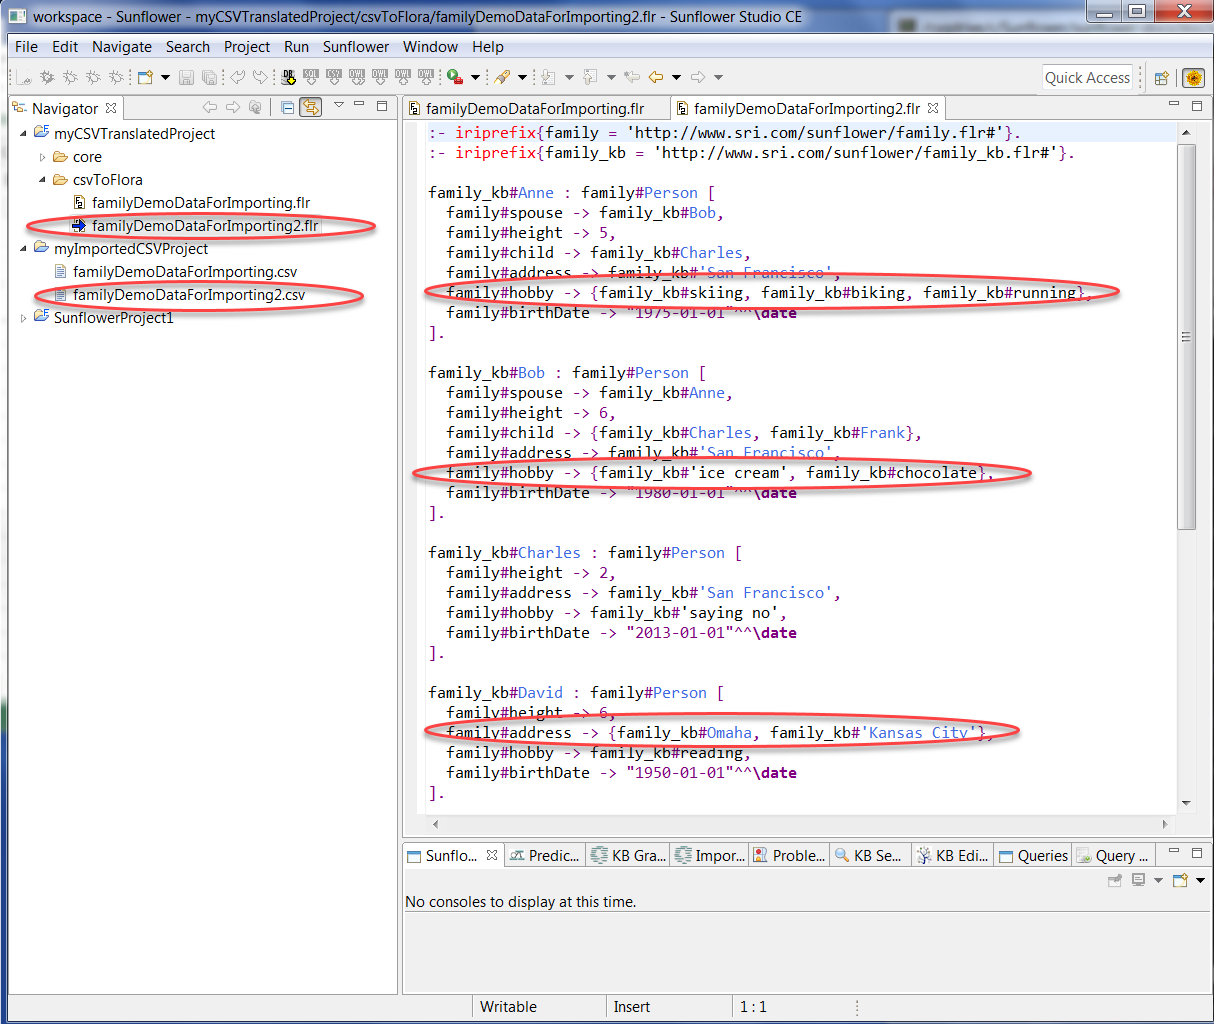
Fig. 115 Content of .flr file from translating familyDemoDataForImporting2.csv
Import SQL File
The format of a valid SQL import file should look like what is shown in Fig. 116. It should have a CREATE TABLE statement followed by a list of INSERT statments.

Fig. 116 Format of valid SQL import file
The procedure for importing a SQL file parallels that of importing a CSV file. Please refer to the Section on Import CSV File for details. A sample .sql file familyDemoDataForImporting.sql is included in the Sunflower distribution under the folder UserManualExamples.
Import SQL database
SQL import can be done by directly connecting to a SQL server. To do this, from the main navigation toolbar, select the Import from SQL DB icon and follow the import dialog. First select the translated folder location, then supply the SQL database information, and finally specify the prefix and namespace information if any. Fig. 117 shows the list of input fields of the SQL database import dialog window.
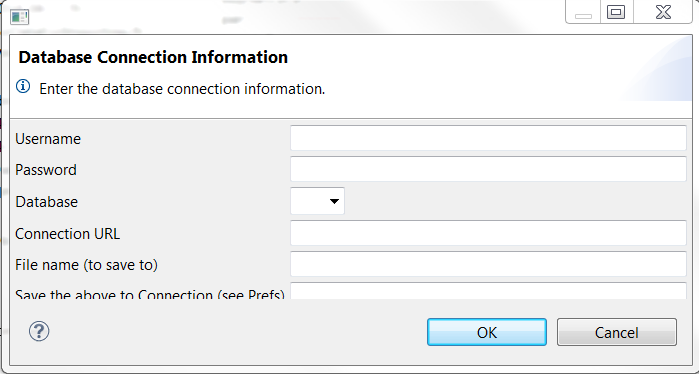
Fig. 117 Dialog box for import from SQL database